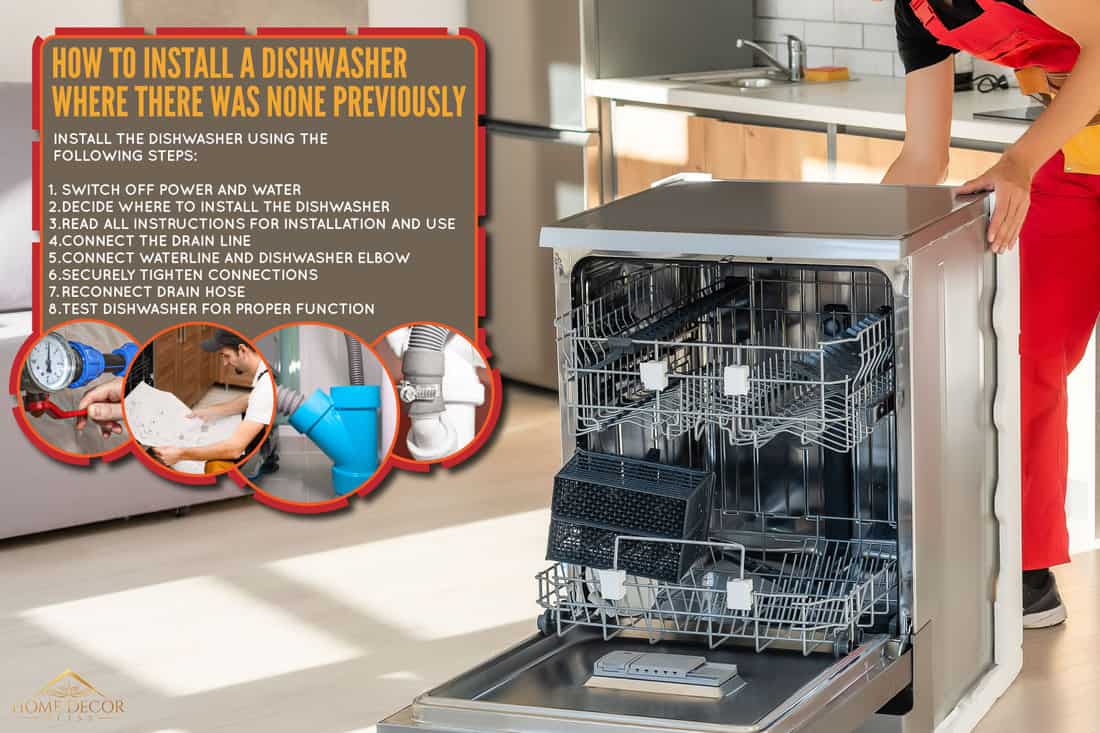
Are you tired of doing dishes by hand and considering installing a console dishwasher in your kitchen? Look no further! This article will provide you with a step-by-step guide on how to properly install a console dishwasher. From gathering the necessary tools to connecting the water supply, you’ll soon be enjoying the convenience and efficiency of a dishwasher in your home. Say goodbye to endless scrubbing and hello to more free time with this helpful installation guide.

This image is property of s3.img-b.com.

Preparation
Gather necessary tools and materials
Before installing a console dishwasher, it’s important to gather all the necessary tools and materials. This will ensure that you have everything you need to complete the installation smoothly. Some of the tools and materials you may need include a screwdriver, wrench, pliers, level, tape measure, pipe thread sealant tape, dishwasher installation kit (which usually includes a water supply line and drain hose), and mounting brackets. Make sure to check the manufacturer’s instructions for any specific tools or materials recommended for your dishwasher model.
Choose the right location
Choosing the right location for your console dishwasher is crucial for its efficient operation. Start by considering the proximity to your kitchen sink, as this will make it easier to connect the water supply and drain. Also, check for a nearby electrical outlet to ensure that the dishwasher can be properly powered. It’s important to choose a flat and stable surface for the dishwasher to sit on, ensuring that it is level. Additionally, consider any nearby cabinets or appliances to ensure there is enough space for the dishwasher to be installed without any obstructions.
Measure and prepare the space
Before installing the console dishwasher, it’s important to measure the space where it will be placed. Measure the width, height, and depth of the available space to ensure that the dishwasher will fit properly. This will also help you determine if any adjustments need to be made beforehand, such as removing cabinet drawers or shelves to accommodate the dishwasher’s height. Once the measurements are taken, clear out the space and make any necessary preparations, such as removing the old dishwasher (if applicable) or making sure the countertop is clean and ready for installation.
Disconnecting the Old Dishwasher (if applicable)
Turn off the power supply and water source
If you are replacing an old dishwasher, you need to disconnect it before installing the new console dishwasher. Start by turning off the power supply to the dishwasher at the circuit breaker. This will ensure that there is no electricity running to the appliance and prevent any potential accidents. Next, locate the water supply valve behind the dishwasher and turn it off to stop the water flow. This valve is usually located on the wall or under the sink. Turning off the power supply and water are crucial steps to ensure a safe and smooth transition to the new console dishwasher.
Drain the existing water
Once the power and water supply to the old dishwasher are turned off, you need to drain any remaining water from the appliance. To do this, place a towel or a shallow pan underneath the dishwasher to catch any water that may spill. Then, detach the drain hose from the sink drain or garbage disposal and allow any standing water to drain into the towel or pan. If there is a lot of water remaining, you may need to use a wet-dry vacuum to remove it. Ensuring that the old dishwasher is completely drained will prevent any water damage or leaks during the installation of the new console dishwasher.
Remove the existing dishwasher
After the power supply is turned off, water is drained, and any necessary precautions are taken, it’s time to remove the old dishwasher. Start by unscrewing the mounting brackets that hold the dishwasher in place beneath the countertop. These brackets are usually located at the top of the dishwasher near the front area. Once the brackets are removed, carefully slide the old dishwasher out from its space. Be cautious of any remaining electrical or water connections that may need to be disconnected before completely removing the old dishwasher. With the old dishwasher removed, you can now proceed with installing the new console dishwasher.

This image is property of homedecorbliss.com.

Installing the Water Supply
Check the manufacturer’s instructions
Before installing the water supply for your console dishwasher, it’s essential to carefully read and follow the manufacturer’s instructions provided with your dishwasher. Each model may have specific requirements or recommendations for the water supply installation process. The manufacturer’s instructions will provide you with detailed step-by-step guidance on how to connect the water supply line correctly.
Connect the water supply line
To connect the water supply line, start by locating the hot water supply valve under the sink. This valve is usually located on the wall or the backside of the cabinet. Once you find it, turn off the valve by turning it clockwise. Next, carefully connect one end of the water supply line to the hot water valve. Ensure that the connection is tight and secure to prevent any leaks.
On the other end of the water supply line, there will be a fitting that connects to the dishwasher’s water inlet valve. Attach this fitting to the dishwasher’s water inlet valve, again ensuring that the connection is tight and leak-free. If the dishwasher’s water inlet valve has a locking mechanism, follow the manufacturer’s instructions to properly secure the connection.
Ensure proper water connection
After the water supply line is connected, it’s important to ensure that the water connection is done correctly. Double-check that all connections are tight and secure to prevent any potential leaks. Once the connections are confirmed, turn on the hot water supply valve under the sink to allow water to flow into the dishwasher. Check for any signs of leakage around the water connections and fix any issues before proceeding further with the installation.
Installing the Drainage System
Check the manufacturer’s instructions
Before installing the drainage system for your console dishwasher, refer to the manufacturer’s instructions for detailed guidance specific to your dishwasher model. The instructions will provide you with step-by-step directions for connecting the drain hose correctly and ensuring proper drainage.
Connect the drain hose
Start by locating the dishwasher’s drain outlet, which is usually located at the back of the dishwasher near the bottom. The manufacturer’s instructions will guide you on the specific location of the drain outlet for your dishwasher model. Once you locate the drain outlet, attach one end of the drain hose to the outlet. Make sure that the connection is secure and tight to prevent any water leakage during operation.
Ensure proper drainage
After connecting the drain hose, it’s important to ensure that the drainage system is properly set up. Check that the drain hose is free from any kinks or bends that could restrict the water flow. If necessary, adjust the position or length of the drain hose to facilitate smooth drainage. Additionally, make sure that the other end of the drain hose is connected to a drain line or a garbage disposal unit and is securely fastened. This will help prevent any water from leaking out onto the floor or causing any damage to your kitchen.

This image is property of homedecorbliss.com.
Wiring the Dishwasher
Check the manufacturer’s instructions
Before proceeding with the wiring of the console dishwasher, carefully review the manufacturer’s instructions specific to your dishwasher model. The instructions will provide you with the necessary guidelines on how to handle the electrical wiring safely.
Turn off the power supply
To safely wire the console dishwasher, it is crucial to turn off the power supply to the designated electrical circuit. Locate the circuit breaker panel and find the breaker that controls the power to the dishwasher’s electrical outlet or junction box. Flip the breaker to the “off” position to cut off the power supply to the area where you will be working. This step is essential to avoid the risk of electric shock or damage to the dishwasher during the installation process.
Connect the electrical wiring
Once the power supply is turned off, it’s time to wire the console dishwasher. Start by connecting the dishwasher’s electrical wires to the corresponding wires in the electrical box or outlet. Typically, the wires will need to be connected using wire connectors, which are provided with the dishwasher or can be purchased separately. Follow the color-coded instructions in the manufacturer’s manual to ensure that you connect the correct wires together. Once the wires are securely connected, use the wire connectors to cover the connections for safety.
Positioning the Dishwasher
Check the manufacturer’s instructions
Before positioning the console dishwasher, refer to the manufacturer’s instructions for any specific guidelines on how to position it correctly. These instructions may include recommendations on spacing requirements, venting, or clearance dimensions.
Slide the dishwasher into place
Carefully slide the console dishwasher into its designated space, ensuring that it is centered and properly aligned. Be mindful of the electrical and water connections, ensuring that they are not being pinched or bent during the positioning process. If necessary, use a level to check that the dishwasher is sitting level from front to back and side to side.
Ensure proper alignment
To ensure the dishwasher’s proper alignment, use the adjustable feet or leveling mechanisms provided with your dishwasher. These mechanisms allow you to raise or lower the dishwasher to achieve the desired alignment. Adjust the feet until the dishwasher is level and stable. Proper alignment is crucial for the dishwasher’s efficient operation and to prevent any potential leaks or malfunctioning.

This image is property of i.ytimg.com.
Securing the Dishwasher
Check the manufacturer’s instructions
Refer to the manufacturer’s instructions to determine the specific requirements for securing the console dishwasher. The instructions will provide you with information on the necessary steps to secure the dishwasher properly, ensuring safety and stability during operation.
Attach the mounting brackets
Attach the mounting brackets to the top of the dishwasher, near the front area. These brackets are designed to secure the dishwasher to the underside of the countertop. Follow the manufacturer’s instructions to correctly position and fasten the brackets. Make sure the brackets are securely attached and aligned with the holes in the countertop to provide maximum support and stability.
Secure the dishwasher to the countertop
Once the mounting brackets are properly attached, use screws or other fastening devices provided with your dishwasher to secure it to the underside of the countertop. Make sure to tighten the screws securely, but be cautious not to over-tighten and damage the countertop or the dishwasher. Confirm that the console dishwasher is firmly secured and does not wobble or shift when pressure is applied. This will ensure that the dishwasher remains stable during operation and prevent any potential damage.
Connecting the Water Supply and Drainage
Check the manufacturer’s instructions
Refer to the manufacturer’s instructions to determine the specific guidelines for connecting the water supply line and drain hose. These instructions will provide you with step-by-step directions to ensure that the connections are done correctly.
Connect the water supply line
Check that the water supply line is securely connected to both the dishwasher’s water inlet valve and the hot water supply valve under the sink. Confirm that all connections are tight and leak-free.
Connect the drain hose
Verify that the drain hose is securely connected to the dishwasher’s drain outlet and the drain line or garbage disposal unit. Ensure that all connections are tight and properly sealed to prevent any leaks.

This image is property of contentgrid.homedepot-static.com.
Testing the Dishwasher
Turn on the power and water supply
With all the connections made, it’s time to turn on the power and water supply to the console dishwasher. Locate the circuit breaker that controls the dishwasher’s power and turn it on. Then, open the hot water supply valve under the sink to allow water to flow into the dishwasher.
Test the dishwasher for leaks
Once the power and water supply are turned on, carefully inspect all the water connections for any signs of leakage. Look for dripping water or dampness around the water supply line and drain hose connections. If any leaks are detected, turn off the water supply and power immediately and fix the issue before proceeding.
Run a cycle to ensure proper functionality
After ensuring that there are no leaks, run a test cycle on your console dishwasher to ensure that it is working correctly. Follow the manufacturer’s instructions to initiate a test cycle, and monitor the dishwasher for any unusual noises or malfunctions. Pay attention to the water flow, detergent dispenser operation, and any error codes that may appear. If any issues are detected, refer to the manufacturer’s instructions or contact customer support for assistance.
Final Steps
Read the dishwasher’s user manual
After successfully installing your console dishwasher, take the time to read through the user manual. The manual will provide you with important information about the dishwasher’s functions, settings, and maintenance instructions. Familiarizing yourself with this information will help you get the most out of your dishwasher and maintain its optimal performance.
Understand its functions and settings
Learn about the various functions and settings of your console dishwasher to take full advantage of its capabilities. Understand how to adjust the wash cycles, select different options, and utilize any special features your dishwasher may have. This knowledge will allow you to customize your dishwasher’s performance based on your specific needs and achieve the desired results.
Enjoy using your newly installed console dishwasher
Congratulations! You have successfully installed a console dishwasher. With all the hard work and preparations completed, it’s time to reap the benefits of your newly installed appliance. Enjoy the convenience and efficiency of having a console dishwasher in your kitchen, making your life easier and your dishes sparkling clean.
